Thursday, May 30, 2013

Barbecue Chicken & Shrimp Tostada

When it comes to dinner, we always look for something that is quick, easy and of course delicious. But, what I like best is making Mexican food that is quick, easy and delicious.

After having my fair share of Mexican, I've developed an idea that takes the meaning of "tostada," to a whole new level. If you've ever wondered what "tostada" means, it's a Spanish word derived from word "toasted." So if you want a Mexican dish that has some spice, crunch and flavor, this is what you need.


Barbecue Chicken & Shrimp Tostada Ingredients      
- 2 chicken breasts (chopped)
- 1/2 medium sized onion (sliced)
- 1/2 c. of small shrimp (peeled & defrosted)
- 2 tbs. cumin
- 1/2  tbs. chili powder
- 1/4 c. of shredded cheddar
- Dash of pepper
- Olive oil
- 2 tortillas
- Corn salsa
- 1/2 avocado (diced)
- Barbecue sauce
- Lettuce
Makes 2 servings

Start by chopping the chicken breasts into small chunks and heat in a medium sized pan with 2 tbs. of olive oil. Once the chicken is almost cooked, add the shrimp and onions. 
Then add 2 tbs. of cumin,  1/2 tbs. of chili powder and a dash of pepper.


After everything is cooked, heat up a medium sized skillet on medium-high with a 1 tbs. of olive oil. Then place a medium size tortilla in the pan, cooking each side for a few minutes. What you should look for is when the tortilla begins to bubble and raise. The purpose of this is to toast the tortilla to get the perfect "tostada" texture. You know the tortilla is done once it gets brown on each side. Then, take it out of the pan and let it set for a minute, it will give the tortilla time to finish cooking. 


Now it's time to start building your tostada. Take a spoonful or two of barbecue sauce and spread a thin layer onto the tortilla. Then take two spoonfuls of corn salsa of your choice. Then, take your shrimp, chicken and onion mixture and spread across the tortilla.

Next, take some of your shredded cheddar and sprinkle onto the mix. Finally, add the lettuce and diced avocado. Then, pick up your tostada like a pizza and enjoy.

Sunday, May 26, 2013

Thai Chicken Pizza

   If anyone knows anything about the news, it's the true what they say about it never sleeping. However, even with a busy month of work, I have a few tasteful recipes to share that anyone willing to take a bite.
  Of course, you don't have to be American to enjoy a great slice of pizza, or a Wisconsinite to enjoy cheese or even from Taiwan to enjoy Thai food. All you need is the willingness to try a a taste of something different, like this special Thai Chicken Pizza.


Thai Chicken Pizza Ingredients
- 1 pizza crust (whole wheat)
- 1 medium sized sweet onion (chopped)
- 1 red pepper (chopped)
- 1 c. chopped green onions
- 3 chicken breasts (chopped)
- 2 tbs. olive oil
- 1 1/2 c. shredded mozzarella sauce
- Homemade peanut sauce (see below)
- 1 can bean sprouts

Start by chopping up your chicken and then heat up a medium sized pan with a tbs. of olive oil. Cook your chicken until brown or until fully cooked. Set aside and start sauteing the chopped red peppers and onions in a small pan with a tbs. of olive oil. Cook until soft. Next, it's time to start the peanut sauce.

Peanut Sauce Ingredients
- 1/2 c. peanut butter
- 1 tbs. garlic
- 2 tbs. rice vinegar
- 3 tbs. hoisin sauce
- 1/2 c. sesame oil
- 2 tbs. soy sauce
- 1/3 c. water
- Dash of sugar
- Few drop of hot sauce
- 3 tbs. of lime

Mix all the ingredients in a medium sized bowl and stir well. Then, spoon out the peanut sauce evenly onto the pizza crust, covering it entirely. Once that's complete, use thongs to spread the chicken and peppers out evenly.  Last but not least, sprinkle the mozzarella cheese on top.

Then, follow the directions on the pizza crust to cook your pizza. Usually it takes around 15 minutes to cook. After it's cooled, sprinkle the green onions, bean sprouts and drizzle a little hoisin sauce on top for taste and presentation. Then, take a taste whether you're from America, Taiwan, Timbuktu, and you'll see what I'm talking about.


Sunday, May 5, 2013

Southwestern Corn Salsa

Well it's Cinco de Mayo so what better day is there to make a good Mexican recipe for having a party or kicking back with a margarita and a movie.

I love when I come across a sweet corn salsa recipe in the store or at a Mexican restaurant.  But why do I have to go out to enjoy something so delicious? That's how I came with a corn salsa recipe that is easy and fresh.

       Southwestern Corn Salsa Ingredients
   -  3/4 c. of corn
   -  1/4 c. minced onions
   -  1/2 tbs. of garlic
   -  1/2 tbs. cayenne
   -  1/2 tbs. cumin
   -  2 tbs. vinegar
   - 1 1/2 tbs. red peppers minced
   - 1 1/2 tbs. green peppers minced
   - 1 tbs. lime
   - 1 can 28 oz. plum tomatoes
      Makes about 6 servings

   Start out by taking your 28 oz. can of plum tomatoes and chop them. Then put them in a strainer to sit for about 20 minutes in a sink. It will help keep your salsa from becoming too watery. While those are straining, take the 3/4 c. of corn, 1/4 c. minced onions, 1 1/2 tbs. of red and green peppers and mix them in a bowl.

Then take all your seasonings and mix them with the veggies. After that's complete, put the 2 tbs of vinegar, 1/2 tbs. of garlic, and 1 tbs. of lime, and mix well. 


 After the tomatoes are done straining, shake the container to get any access fluid out the bottom. Then, mix in the tomatoes with your other ingredients.

You can add more lime or more veggies depending on your taste buds. Once everything is mixed put some seran wrap over the bowl. Chill in the fridge for about an hour and then enjoy a great mild Mexican salsa.

Saturday, April 27, 2013

Cooking 101: Reheating Rice & Pasta


       When it comes to reheating leftovers, you often get the "It doesn't taste the same," or "I just throw out my leftovers." Well I pulled out my detective kit to figure out why rice and noodles don't taste the same when they're reheated. I found a simple solution so your dish tastes the same as when you first took it off the stove.

  Now, the problem I realized is that noodles and rice become extremely dry once they're reheated. In other words, all the moisture escapes, leaving a horrible uncooked taste.


   Reheating Rice & Pasta
- 1 tbs. of water
- 1 paper towel or napkin

Next time you have leftover rice or pasta, put it in a separate bowl that can go in the microwave. Take 1 tbs. of water and drizzle it over the top. Then, take a spoon and mix the rice or noodles with the water. I usually will eyeball how much water I use because you feel if there's enough moisture on it. I would say 1tbs. of water for every cup or so of noodles of pasta.

After that's all done put a paper towel on top to cover the bowl. The idea here is the paper towel will help keep the steam in, which keeps the moisture in. Reheat as desired and stir. Once it's warm enough, take the bowl out of the microwave and take a taste. It'll feel like your dish was made the same day and you'll say, " Why didn't I think of that?"

Thursday, April 18, 2013

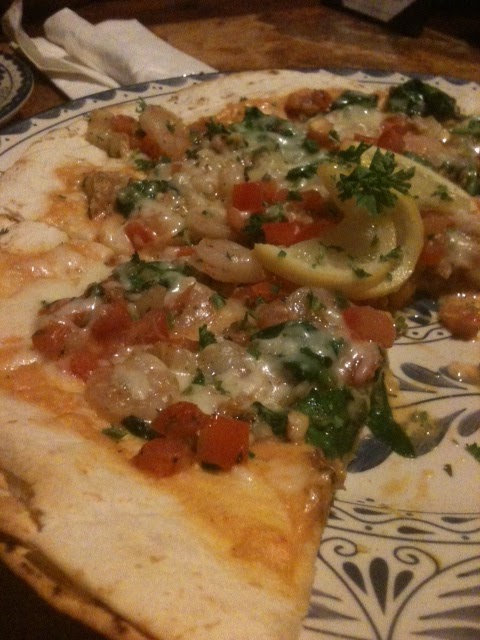
Delicous Dishes: Manny's Cocina "Seafood Cortez Pizza"

After growing up in the southwest suburbs of Chicago, I decided that I know when I come across a solid piece of pizza. But, after moving to Wisconsin, I was on a mission to find some good pizza because the state has the best cheese around.

Yet, I did come across something the other day that was a nice break from my craving for deep dish pizza. I had the pleasure of visiting Manny's Cocina in Eau Claire, WI for a nice sit down dinner.

After skimming the menu, something stuck out at me from the very beginning and that was their seafood pizza. I do enjoy lobster, crab, tilapia and shrimp especially when dipped in butter. However, the "Seafood Cortez Pizza" took fish and pizza to a whole new level that I never thought my taste buds could experience.

It has the crunch a pizza needs, along with a variety of fishy flavors with an added chipotle cream sauce. Each ingredient had a purpose and every bite was simply delicious. The pizza was a bit on the expensive side for an appetizer, but because of all the seafood it is definitely worth it.

Seafood Cortez Pizza
Bay shrimp, crabmeat, salsa, pico de gallo, a special chiptole cream sauce, cheddar and jack cheese on a light crust.

The best part about this item is the restaurant also offers a nachos selection that is very similar. Manny's Cocina has two locations, one in Eau Claire, WI and one in Onalaska, WI.


Saturday, April 13, 2013

Balsamic Chicken Veggie Wrap

My healthy food kick continues with a wrap that has all the fixings and flavor you'll need for a nice lunch or light dinner. The best part is you can throw this together with things leftover in your fridge on a weeknight after a long day of work.   

Balsamic Chicken Veggie Wrap Ingredients  
- 2 chicken breasts
- 4 tbs. olive oil
- 1 medium sized red pepper (sliced)
- 1 small sized onion (sliced)
- 2 tbs. basil
- 1/2 c. sliced mushrooms
- 2 1/2 tbs. balsamic vinegar
- 1 pkg. whole-grain tortilla wraps
- Dash of pepper                                                        
Servings: Makes 4 wraps 

    Start by heating 2 tbs. of oil in a small skillet. While its heating, chop the chicken up into small strips. Then, cook the chicken until done. Set the pan aside to let the chicken cool and grab another small skillet.

   Heat 2 tbs. of oil on medium in your new skillet. Then, put in your slices of red pepper and cook them for a few minutes. Once they're start getting soft, add the 1/2 c. of sliced mushrooms, slices of onion and 2 tbs. of basil and pepper.
  
After a few minutes, add 2 1/2 tbs. of balsamic vinegar and cook until it bubbles for a minute. This will allow the vegetables to soak up the balsamic vinegar and finish cooking.

Once the vinegar bubbles, take the vegetables off the hot stove and allow to cool. Then take a tortilla wrap and put the vegetables inside and lay your pieces of chicken down. Wrap it up tight and enjoy all the flavors. The best part of this wrap is you can eat it either hot or cold.


Friday, April 5, 2013

Fish Tacos w/ Mandarin Avocado salsa

Lately,  I've been a healthy food fix and I do love me some fish tacos. I normally fry them to get a nice flavor and added crunch, but that means added fat and calories. Yet, these have low fat and a lot of flavor. The best part is you can choose any fish you like. I chose salmon, but this would work well with tilapia, shrimp, or even pollock. 

The dish is simple and combines my special dill sauce, baked salmon and my mandarin avocado salsa. This works great for lunch or dinner because it's very light.

 
Fish Tacos w/ Lemon Dill Sauce Ingredients
- 4 filets of salmon
- 2 tbs of lemon
- 1/2 c. of mayonnaise
- 1/4 c. of crushed dill
- 1 tbs. of dijon mustard
- Salt and pepper to taste
- Tortillas
- Lettuce 
Servings: Makes 5 tacos depending on fish size

Start by preheating your oven at 375 degrees, and then putting your salmon in the oven on a cookie sheet, covered with tin foil. Let it cook for about 25 minutes, or until its flaky.

While your fish is cooking, start making your lemon dill sauce. Mix in a bowl 2 tbs. of lemon, 1/2c. of mayonnaise, 1/4 c. of crushed dill, 1 tbs. of dijon mustard, salt and pepper. Stir and add additional ingredients based on your preference. Place in fridge to keep it fresh until the salmon is ready.


 Mandarin Avocado Salsa Ingredients
  - 1  11 oz. can of mandarin oranges (chopped)
  - 1/2 a small onion (chopped)
  - 1 avocado
  - 2 tbs. of lime
Servings: Makes about 5 tacos or more

To make your salsa, smash one avocado in a bowl. Then, add your chopped mandarin oranges, 1/2 small chopped onion, 2 tbs. of lime and mix together well.

By this time your fish will be fully cooked and you can take them out of the oven. Then, you can start forming your fish taco.

Take one tortilla and warm it in the microwave for about 25 seconds. Then, take the Lemon Dill Sauce out of the fridge and spread it on the tortilla. Next, cut your filet in half and crumble salmon on top.

Finally take a spoonful or two of your salsa. Last but not least break apart a few lettuce leaves and sprinkle on top. This will give your fish tacos the perfect crunch on a summer day or any other day.

Then, just fold your fish taco how you want it. I like folding mine like burrito, because it keeps all the goodies inside and then I can cut it in half and look at how healthy and delicious the tacos look. Plus, if you cut it in half, it gives better presentation to the dish. Enjoy!